Business

nav

Comments

3D Phone
3D Tablets
3D Lapi
3D Tables Coming Soon!
3D Lapi Coming Soon!
Showing posts with label Tutorials. Show all posts

WINDOWS 7/8 HIDDEN SCREEN RECORDER !!!

Windows OS(  applies to windows 7 and the succeeding versions) possess a  screen recorder i.e Problem Steps Recorder (PSR)

You can use Problem Steps Recorder to automatically capture the steps you take on a computer, including a
text description of where you clicked and a picture of the screen during each click (called a screen shot). 

Once you capture these steps, you can save them to a file that can be used by a support professional or someone else helping you with a computer problem.

windows screen recorder
Screen Recorder


To record and save steps on your computer

  1. Open Problem Steps Recorder by clicking the Start button Picture of the Start button, and then typing psr. In the list of results, click psr.
  2. Click Start Record. On your computer, go through the steps on your computer to reproduce the problem. You can pause the recording at any time, and then resume it later.
  3. Click Stop Record.
  4. In the Save As dialog box, type a name for the file, and then click Save (the file is saved with the .zip file name extension).
    To view the record of the steps you recorded, open the .zip file you just saved, and then double-click the file. The document will open in your browser.
     WINDOWS 7/8 HIDDEN SCREEN RECORDER share if you like

Easily Create A Bootable Pen Drive Without Any Software of window XP/7/8

Have you Imagine ever that your CD-Rom is not working Properly what will you do if you want to "Format" your system urgently.How poor will you fell.So here I am Going To tell you that How you can" Easily Create A Bootable Pen Drive Without Any Software of window XP/7/8".
So Keep Following me:-

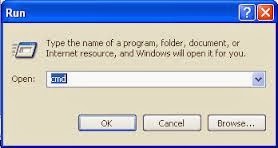
1:Go To "Run".

2:Type "Diskpart".


3:Type "listdisk" and press Enter.


4:Select Your Disk which is your Pen Drive.
(Ex-Type Select disk 1 And Press Enter.)
     Insert your  pendrive  into your  PC slot  after  that  select  your disk  name ( i.e is your pen drive name ) to  select your  pen drive  Type  select  disk1 ( in place  of disk1 write your  pen drive name) then press Enter.

5:Disk 1 is Now Your Selected Disk.

6:Type "clean" and press enter.
     Now  your  Disk is selected  (i.e  your  pen drive)  and now we  have to clean  the Disk  . to  do that  Type in   clean the  press Enter

7:Type"create partition primary" and press Enter. 
     your  Disk is  clean  now  we  have to create  primary  partition in your  Disk (i.e Pen drive) to  do  that we  have  to  type  create partition primary and  press Enter

8:Type "active" and press enter.
     After creating  primary partition  we have to  activate our  Disk  we can do it  by  simply typing  active in cmd  and press Enter

9:Type "format fs=fat32 quick" and press enter.
    Now  we  are  ready  to format  your  pendrive now type format to format and next type fs  and  select  the format  type  and  os  bit size i.e fs=fat32   and  type  quick for  quick format of your pendrive.

10:Type "exit".

Here You go Copy The Window 7/xp/8 into pen drive and you are ready to install window. To Boot it
make changes into Your "BIOS............."

Select USB as First boot Device.
Enjoy.................

Disable All YouTube Ads with simple tricks 2014


Google has been pushing for more ads in YouTube, partly because running the world's largest video site is not cheap, but also because Google likes money. The company tries to make the ads relevant and they're usually not that intrusive, as even the pre-roll ads can be skipped. 

Still, some people don't like and don't want any ads in their internet. Thankfully, there are plenty of tools for them, countless ad blockers are available for all browsers, even mobile ones.
 
 
In this Post , we will at 3 simple that will Disable/Block/Turnoff all the pesky advertisements. Lets Start...


1.Disable Ads on YouTube With This Simple Command

  1. Open up a YouTube video (any will do).
  2. Open up the developer console (Ctrl-Shift-J for Chrome, Ctrl-Shift-K for Firefox,  Press F12 for Internet Explorer )
  3. Enter the following code:

Finally, once you have a console open, just paste the code: 


CODE

document.cookie="VISITOR_INFO1_LIVE=oKckVSqvaGw; path=/; domain=.youtube.com";window.location.reload();


Note : Since this is an experiment carried by YouTube itself, you can expect it to stop working at some point in the future.


2. Add AdsBlock plugin to your browser


With AdBlock plugin to your browser, With this plugin most ads aren't even downloaded at all. So you can focus on enjoying the content you want, and spend less time waiting for it.

follow these  step to add plugin to your browser:

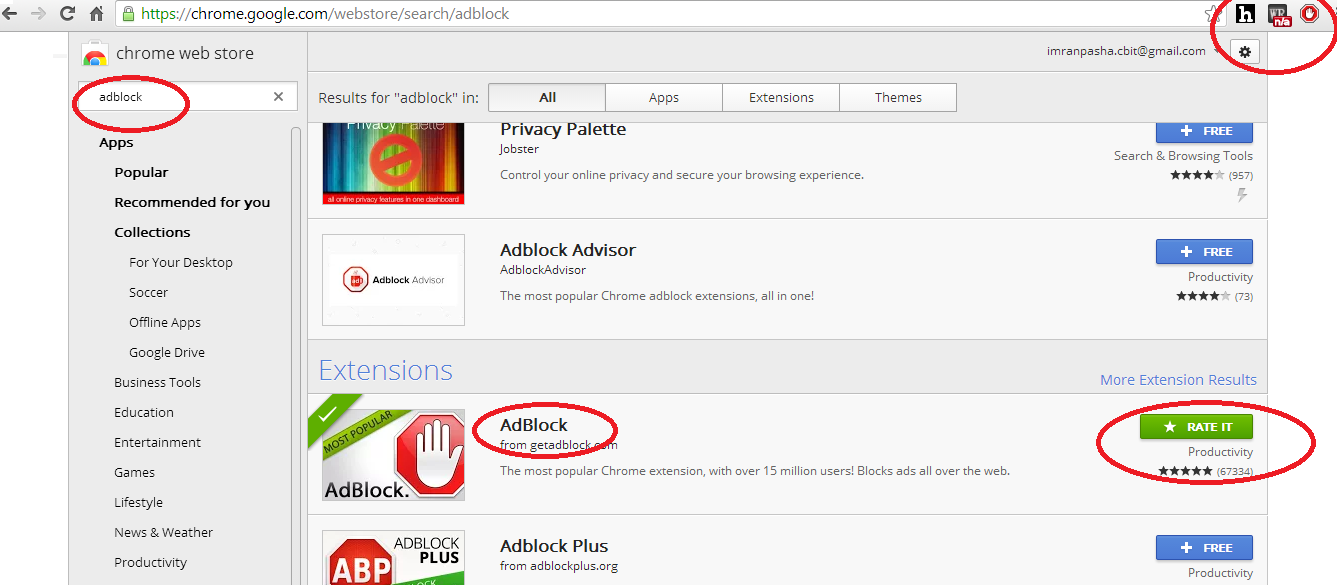
  • Goto  Chrome Extensions
  • In Search Box type AdBlock
  • Then click on Free beside the AdBlock logo as shown in the below fig.
  • Install it to your Browser ,by clicking on Add
  • After installation AdBlock logo  will be appeared on the Tool Bar
  • Now , you are done  


 3.Turning Off Advertisements in YouTube Settings


If you’ve watched more than 5 or 10 minutes of YouTube you’ve probably come across those pesky advertisements that pop up at the bottom of the video. They just pop in and hover obscuring the bottom portion of your video blocking whatever might be underneath – like what can be seen in the image below.
On average, those ads take up more than  15% of the screen space while visible. In this tutorial, we’re going to show you how to turn off advertising on your YouTube videos.
To turn off advertisements in all your YouTube videos, follow these instructions:
  • Login to Youtube/Google Account
  • Visit YouTube Page
  • Click on Profile Icon on Top Right of Page
  • Click on YouTube Settings
  • In Content Area – Click on View Additional Settings Link
  • In Menu Bar at Left, Click on Advanced
  • View Advertisements Section Heading
  • Click on Radio Button for Do not allow advertisements to be displayed alongside my videos.
  • Site back and relax – you’re done!

Remember to click the save button on the top right before closing this window. That will ensure your settings stick.
You can reload your YouTube window. To test the settings, log out of your account and then try viewing your videos. You should see that advertisements have been turned off completely, and they will not show to your video viewers.

If you have any questions about this video tutorial, please leave a comment here on our YouTube page. If you’d like to see other video tutorials, be sure to leave us a note. Thanks!

Prevent Being Tracked Online - Different method that Help you _ 2014


It's  a lot of news going around the amount of private  information we store online and who has access to view that information being moving around Lets see what the first question we can ask ourselves is

Why would someone want to track me?

Well your Company + Information = Big Money to them

  • E-mail address for spam
  • Physical address for sending product information
  • Phone Numbers for selling marketing
  • Web Browser  habits to target  Banner Ads

The more they know the more they can bomb bard with personalized  advertisement
And other facilities such as Govt and other governing bodies are most relies on protected parents they want to what you are doing and make sure that you are not going into trouble and punish you if you do.

Well these are necessary bad things and underling issue that we don't have choice and what collecting about data there is no way to turn it off. Basically what ever you kept in internet its a subject to being collected . So, what option do we have to combat this let see some different tracking methods starting with...

Website tracking

If you went to  any site and you saw twitter this , Like this  page or g+ one Button .

    
This mean the social network behind this button probably know that your visiting that site.


Even if you block any site till they can track you by IP address (i.e unique  address for individual internet connected to network) 

site tracking

  1. HTML pages contain a set of data that describes and gives information about other data. they are called as metadata
this is know as meta data
  • they can log your ip address.
  • what time you have  visited their site.
  • past referrence that you other site visited.
  • How much time you have spent in their sites

These date is enough to reveal your browsing history as you can see the data is so anamous . but as you can see they don't require your personal information to know your online activity.

you can use 3 steps to combat this

first install ghoster

which tell you what method each site imposes for tracking  you . ghoster can be downloaded from the following link given below.

http://www.ghostery.com/

Second check  DO NOT  TRACK in your browser

Do Not Track  is enabled in your browser . Which is  in your privacy setting this put message to all third party to turn off all third party trackers. that help in not tracking our history which is stored in our browser.

To enable this in your browser Follow the steps given below.

Open your Browser >> Menu >> Settings >> Click on Advance Setting >> in privacy check the Box as shown in the above fig.

Install Track Block Program

lastly install some good tracking block program such as ABINE Don't Track Me Application that stop most tracking  methods. you can download this in following link given below.

Social Media

They use your personal information  to sell to advertisement. And the most worst part is we voluntaryly give our personal information to them.

so what we need to do make sure they using our data our specification reviewing their privacy setting that we have understand them
also check the privacy setting for apps


IF YOU HAVE PRIVATE INFORMATION THAT NEEDS TO REMAIN PRIVATE DON'T POST IN SOCIAL NETWORKING SITES


It also not a bad idea  to mix up your online identity use your contact infomation only if it have to other wise
you can do things like  generate temporary email address at


This will resist to hider your email address. and destroy your mail after 10 minutes .OR generate fake burner phone number to hide your phone number at


E-mail

Now , coming to mail providers such as gmail , hotmail, outlook or yahoo

your email are stored on there servers so they have right to use how ever they want only way to remain your email content in private is to encrypt the message

encryption means  converting your message into some scrambled letter that no one can read. this message is sent through the network and at the other end user decrypt the message to get the orginal message that you have send


the simple way to doing this is using a browser plugin called MAILVELOPE which gives the encrytion  option to all the major web mail provider But the biggest source of data leakage is done by ISP

ISP

ISP stands for Internet Service Provider
fact that if you are connected to internet mean some company is providing you that service which mean everything that you do online goes to them first so they can see what ever you do and do what ever with it . that frightning if you thing about it but there is one way to avoid them its called VPN


virtual private networking.


vpn make an encrypted connection from your computer to another computer some where in the world . So, all the internet activity is appeared to going through the computer that u are connected to not yours .From your isp prespective  your internet activity look like a bunch of jumbled encrypted mess a good vpn cause a monthly fee  but a decent  free alternative is cyberghostvpn


  Note : Is it is help full ?  ...... like our page for more update. click here


Still then  Like our Facebook Page and wait still our next post .Thank you


How To Use Sfc command To Repair System Files 2014

What is SFC scanner command?


The sfc /scannow command (System File Checker) scans the integrity of all protected Windows  system files and replaces incorrect corrupted, changed/modified, or damaged versions with the correct versions if possible.

Why SFC scanner?


The main reason for using this utility is when you suspect there may be a problem with a Windows XP system file.

Perhaps you get a dialog box appear informing you of a problem with a .dll file, or your program will just not load! It is therefore worth checking to see if there are any corrupt system files using scannow sfc.

Follow these steps for using sfc with the scannow option to repair important Windows files:
Using sfc /scannow to repair important Windows files usually takes 5 to 10 minutes.

Step 1 :-


Open an "command prompt" (right click -> Run as administrator), and do the following  step 2 or 3 below for Scan that u like to do now.

Type cmd in Run

goto : >>start>>Run>>type in as cmd

>>Right click and Run as adminstrator


Step 2:-


Once Command Prompt is open, type the following command and then press Enter. (see screenshot below for guidance).

sfc /scannow
  
NOTE:
  • There's a space between sfc and /scannow.
  • This may take a little bit to finish.


Scans and only verifies the integrity of all proteced system files only. This command will not change your system files.

 In the command prompt, type sfc /verifyonly and press Enter.

 When the scan is complete, hopefully you will see all is ok like the screenshot below.


Restart your computer if sfc /scannow did actually repair any files

Important: System File Checker may or may not prompt you to restart but even if it doesn't, you should restart anyway.

Note: In some situations, especially in Windows XP and Windows 2000, you may also need access to your original Windows installation CD or DVD.


Step 3 :-


How to See and Read Only the "SFC" Scan Results from the CBS.LOG

  When SFC runs, it logs it's actions into the C:\Windows\Logs\CBS\CBS.log. The steps in this option will show you how to see only the specific SFC entries with the [SR] tags in this CBS.log. This can be helpful to show you what files SFC could not fix automatically.
  
1. Open an "command prompt" (right click -> Run as administrator).

2. In the elevated command prompt, copy and paste the command below, and press Enter. (See screenshot below)


findstr /c:"[SR]" %windir%\Logs\CBS\CBS.log >"%userprofile%\Desktop\sfcdetails.txt"


 Open the sfcdetails.txt file on your desktop to see the SFC scan details in the CBS.LOG.

NOTE: This will place a sfcdetails.txt file on your desktop with only the SFC scan result details from the CBS.LOG in it..

NOTE:
  • If SFC could not fix something, then run the command again to see if it may be able to the next time. Sometimes it may take running the sfc /scannow command 3 or more times to completely fix everything that it's able to.
  • If not, then download and run the 32-bit (x86) or 64-bit (x64) System Update Readiness Tool for your same installed 32-bit or 64-bit Windows 7, restart the PC afterwards, and try the sfc /scannow command again.
  • If still not, then run the sfc /scannow command at boot.
  • If still not, then you can attempt to run a System Restore using a restore point dated before the bad file occured to fix it. You may need to repeat doing a System Restore until you find a older restore point that may work.

  Note : Is it is help full ?  ...... like our page for more update. click here


Still then  Like our Facebook Page and wait still our next post .Thank you


Create the folder (INViSIBLE or HIDE ) without using Hide Option


An easy and fast way to make invisible (or hide)folders in Windows


Hiding (or making invisible) folders is an effective way to keep prying eyes away from your private documents. It can keep your information safe from those who want to get some important document from you. If you  feel like spending much on a piece of software for that one single purpose, here’s a easy and fast way to hide files and folders in Windows by yourself.

This instruction will teach you how to make an invisible folder. You can hide lots of things in it and nobody, but you!


Step 1:  Creating The Folder


First you have to make a new folder on the Desktop (or any path you wish) follow the below Instruction to do this.

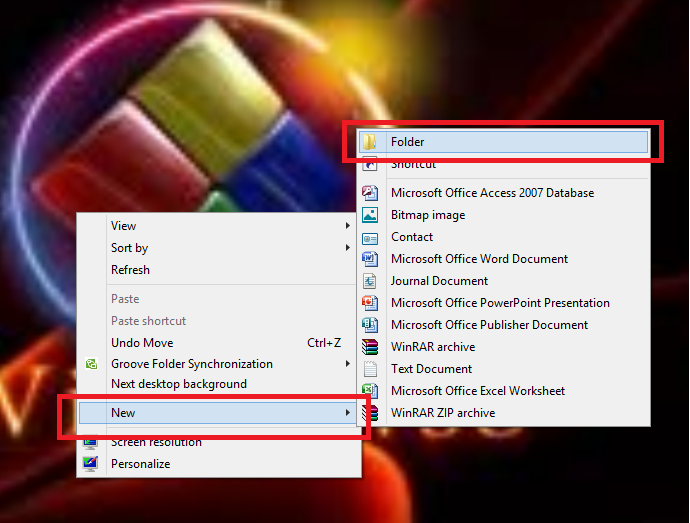
  •  right click on your desktop
  • go to "new"
  • click "folder"


a new folder should pop up...


fig.1


fig.2


Step 2: Making The Name Invisible!!!

 making the words invisible: to hide your file u should make the folder name invisible so, that other prying eyes couldn't see it. To do this follow the below instructions.


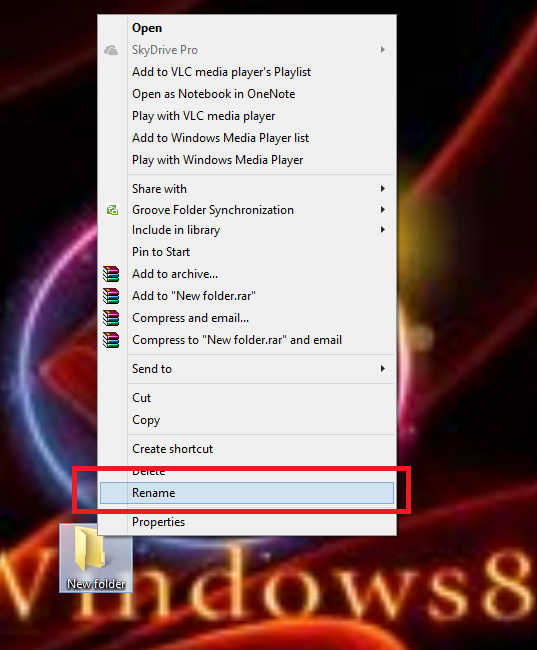
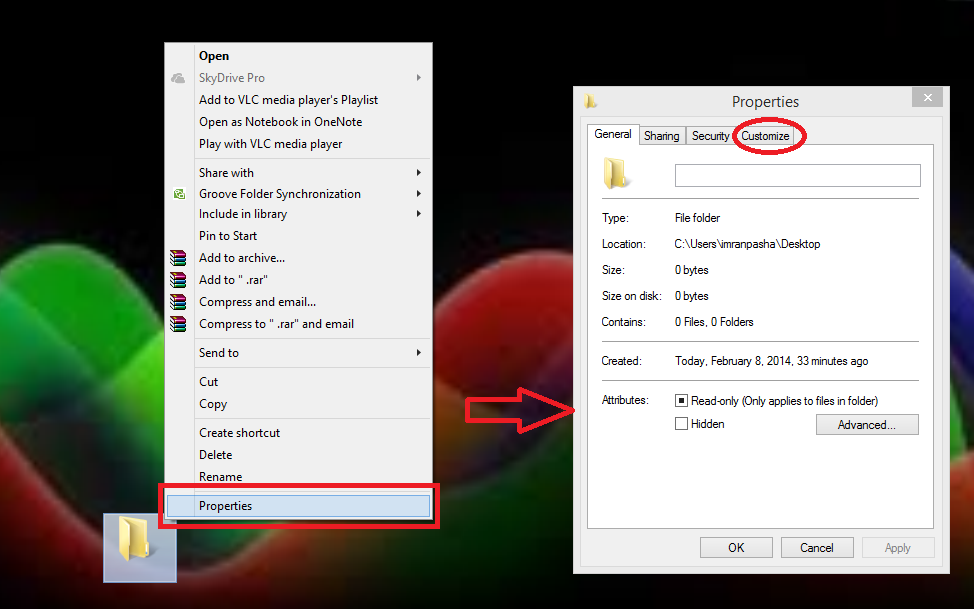
  • Right click on the New folder.
  • go to properties
  • go to the rename box
  • hold ALT and press "0160" in the box (use a number pad)


fig.3
fig.4


Note: if u don't have NUMBER PAD all laptop users and some desktop user your laptop has the "fn" button, 1. hold "fn" 2. press the numbers (usually found on "u, i, o, j, k, l, & m") 3. then type in the 0160 thing


Step 3: Making The Folder Invisible!!!

making the folder invisible: to make  your folder invisible (it sound like magic but it is not) u should make the folder  invisible so, that other prying eyes couldn't get the Hint of  it. To do this follow the below instructions.

  •  right click on the folder
  •  click on "properties"
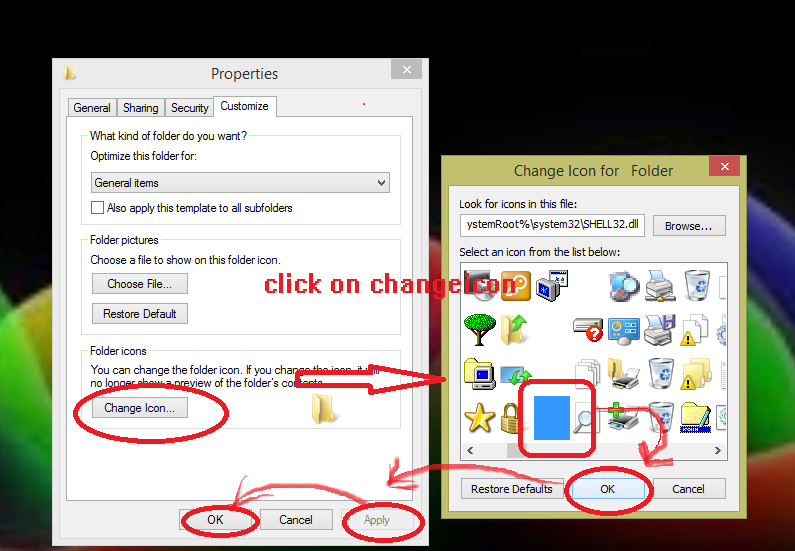
  •  click on "customize"
  •  click on "change icon"
  •  Scroll a bit, u should find some empty spaces, Click on any one of them .


it should be invisible...


fig.5

fig.6

 now u can store ur personal data without any 3rd party tools


Step 4: If You Have Vista

I just got vista not too long ago. I also found this annoying bug in vista. My invisible folders wont delete!

Here's what you do:
  •  hold "shift" and "right-click" the desktop
  •  click "open command window here"
  • the command prompt should open
  •  type in:
  • ren "(hold alt and press 0160)" temp
  •  move the folder into the recycle bin


If you have any problem  or any issue  with this  

Create the folder (INViSIBLE or HIDE )  without using Hide Option

feel free to comment below..

Still then  Like our Facebook Page and wait still our next post .Thank you